
If your kitchen plumbing fixtures have seen better days, it’s time to give them some tender loving care. The unsung heroes of our kitchens, these fixtures are exposed to a myriad of wear and tear. So, let’s journey together on the best ways to clean and maintain these pivotal parts of our homes.
Contents
- Starting Your Cleaning Process
- Cleansing A Tap Head
- Steaming Tap Heads Safely
- Vinegar Solution for Taps
- Aerator Care and Cleaning
- Maintaining Stainless-Steel Sinks
- Preserving Porcelain Kitchen Sinks
- Deep Cleaning Taps and Knobs
- Drain and Garbage Unit Maintenance
- Baking Soda Drain Detoxification
- Garbage Disposal: Cleaning 101
- Sanitizing Taps Regularly
- Weekly Tap Cleaning Regimen
- Removing Tap Calcium Buildup
- Conclusion: Maintain Clean Kitchen Plumbing
- Frequently Asked Questions (FAQ)
Starting Your Cleaning Process
So where do we start? The cleaning process begins with gathering all necessary supplies. Your effective cleaning toolkit should include a variety of items from disinfectants to microfibre cloths, scrub brushes, and perhaps the most undervalued tool, your trusty old toothbrush. Don’t forget that homemade solutions can work their magic too.
Research indicates that using a disinfectant cleaner can eliminate up to 99.9% of dreaded germs on hard non-porous surfaces like kitchen fixtures.[2] Choose cleaners with an EPA registration number to ensure their effectiveness against bacteria and viruses.[6]
If statistics are anything to go by, you’re in good company – 74% of Americans reach for a store-bought all-purpose cleaner for their kitchen cleaning tasks.[3]
Regardless of whether you’re using homemade or commercial cleaners, our crucial advice is: use the right product for the right task. Your precious stainless-steel sink might not appreciate the same treatment as your classy porcelain one!
Cleansing A Tap Head
A pivotal aspect of any kitchen is undoubtedly the tap head. It’s something we often overlook but consider this – NSF International found out that these innocent-looking items harbour an average of 13,227 bacteria per square inch![1]
While it’s true that majority of these critters are harmless, we should make it a habit to clean our tap heads regularly. Unfortunately, a study by the University of Arizona revealed that on average, people clean their kitchen taps only once every seven days.[5]
Fear not! This is where your toothbrush comes in. Armed with mild soap and water, gently scrub away the grime and rinse afterwards. Remember: the secret to efficient cleaning lies in frequent but gentle cleaning.
Commercial cleaners promise stellar results but remember a golden rule: try the cleaner on a small, hidden area first to ensure it won’t ruin your fixture!
Steaming Tap Heads Safely
Next up, we have an old trick – steam cleaning. This natural method involves filling a bag with white vinegar and fastening it over the tap head overnight. The steam that forms helps dissolve those stubborn mineral deposits.
This technique requires caution though. While vinegar can be a magical cleaner for certain materials, some finishes can be damaged so check manufacturer’s instructions first before embarking on this vinegar vacation.
Patience is virtue here; allow your tap head to soak up this ‘spa experience’. As our mums taught us: if at first you don’t succeed, try and try again! Sometimes those deposits need a bit more persuading (and more soaking) to come off.
Moreover, bear in mind the duration of exposure. Leaving those fixtures drenched for exceedingly long hours could lead to damage. Better safe than sorry!
Vinegar Solution for Taps
As mentioned above, for those who can use it safely on their fixtures, vinegar is a solid choice. A Consumer Reports survey found that 28% of people prefer homemade cleaners which can include this versatile liquid.[7]
Vinegar is particularly effective because it’s a natural descaler. This means it works wonders on those harmless but pesky lime deposits that linger on our fixtures.
Mix up a solution of equal parts vinegar and warm water inside a spray bottle, spray generously, leave for a few minutes, then scrub lightly with your soft cloth or non-abrasive sponge. Finally, rinse and wipe dry.
Remember, as beneficial as vinegar is, overuse or prolonged contact can lead to undesired results, especially on special finishes like nickel or antique finishes.
Aerator Care and Cleaning
Moving on to another often overlooked component – the aerator. This tiny device located at the tip of your tap might be small but it sure plays a gigantic role in maintaining water pressure and preventing splashing.
Taking care of your aerator starts with regular checks every couple of months. Unscrew it carefully from the tap (righty tighty, lefty loosey) and take a peek inside. If there’s biobuild-up or mineral deposits, it’s time for a bath!
An efficient soak in vinegar should clear up obstruction and restore your aerator to its full flow glory. After soaking, use a brush or old toothbrush to gently scrub off any remaining residue.
Once you’re done cleaning and rinsing the aerator, screw it back into the tap making sure not to crossthread or over-tighten. Your aerator is now ready for action!
Maintaining Stainless-Steel Sinks
The world collectively invested around USD 31.49 billion in household cleaners in 2020 alone.[4] An impressive number that hints at the treasures our sinks hold and how important it is for us to take proper care of them, right?
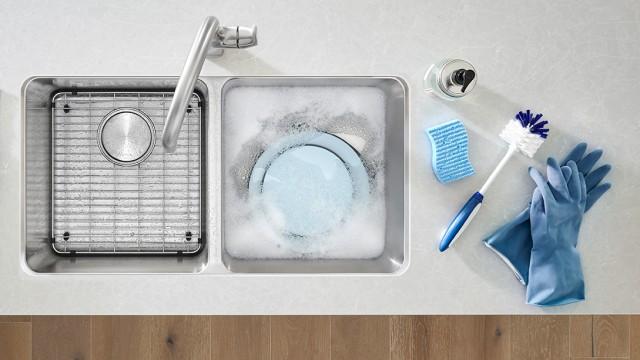
To keep your stainless-steel sink in its prime, remember – clean after each use! A swift rinse and pat dry goes a long way. This simple act can prevent the buildup of harmful residues.
For getting rid of more stubborn stains, a paste made from baking soda and water can be used as an effective cleaning solution. Apply the paste, let sit for a bit, then scrub gently with a non-scratch sponge in the direction of the grain.
Rinse thoroughly after scrubbing and dry the sink immediately to prevent water spots and streaks. Your stainless-steel sink should now be sparkling clean!
Preserving Porcelain Kitchen Sinks
Last but not least, we come to porcelain kitchen sinks. With their smooth and glossy finish, these beauty queens need a little extra love.
Like stainless steel sinks, porcelain fixtures also need to be cleaned after each use. However, care is needed when selecting cleaning tools; abrasive sponges or harsh chemicals might ruin your porcelain’s day faster than you can say “sparkling clean”.
A cleaner specifically formulated for porcelain is always a good idea. A soft cloth or sponge together with gentle circular movements can work some serious magic.
Nicknamed ‘Old Faithful’, Baking soda sprinkled on a moistened cloth creates a mildly abrasive ‘scrubber’ which can tackle those tougher stains. Rinse well afterwards.
Well mates, there you have it. Your comprehensive guide to keeping your kitchen’s plumbing fixtures free from bugs and gleaming with cleanliness. Happy cleaning folks!
Deep Cleaning Taps and Knobs
Let’s get started with the first line of defense in your kitchen-the taps and knobs. These elements are in daily use, and therefore accumulate bacteria at a severe rate. A study by NSF International found kitchen sink taps harbor an average of 13,227 bacteria per square inch in the crevice where the sink and tap meet – shocking, right?
To combat these germs, research indicates that using disinfectant cleaners can eliminate up to 99.9% of harmful microbes on hard non-porous surfaces such as your tap. The Environmental Protection Agency recommends cleaners having an EPA registration number to ensure their efficacy.
The process is simple: Moisten a cloth with the cleaner and scrub all components thoroughly. For crevices, an old toothbrush works wonders, reaching into hidden spots that can house colossal germ populations. However, don’t forget to rinse all parts with warm water after cleaning!
A recent survey from the American Cleaning Institute showed that 74% of Americans use store-bought all-purpose cleaners for such kitchen tasks. The global household cleaners market size with a valuation of USD 31.49 billion in 2020 only confirms this fact!
Drain and Garbage Unit Maintenance
Moving onto another vital part of your kitchen plumbing – the drainpipe and garbage unit. Regular maintenance here will prevent blockages that can lead to significant problems down the line.
The first step includes ensuring no food scraps make their way down the drain; Using a sink strainer eliminates this menace effectively. Secondly, remember that grease or oil should never get poured into drains-these cool down, solidify, and wreak havoc to your pipes!
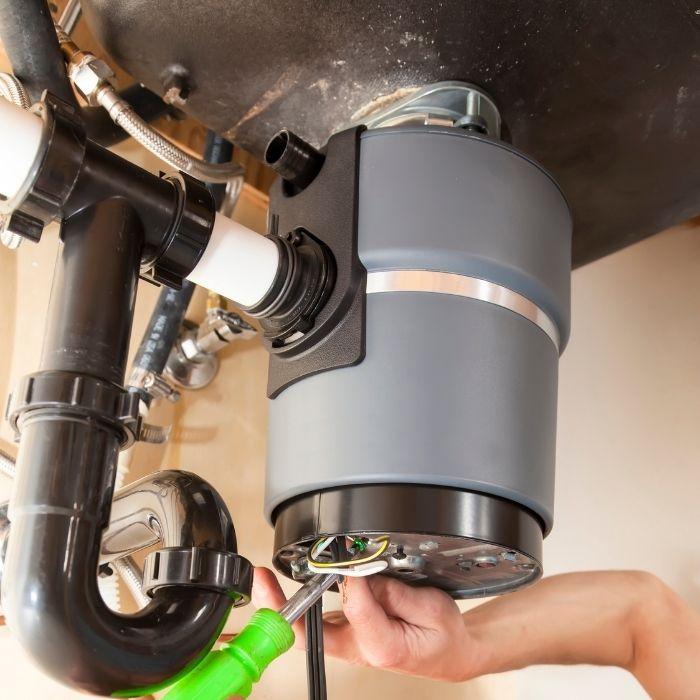
If your kitchen plumbing features a garbage disposal unit, maintenance is indispensable. Run cold water before, during, and after using the disposal-this removes waste efficiently, reducing clogs risk. Furthermore, avoid hard or fibrous waste like bone or corn husks which can damage or obstruct the disposal.
It’s always a good idea to do regular inspections for any possible leaks or damages and calling our experts at Dan’s Plumbing for a quick fix!
Baking Soda Drain Detoxification
Did you know that a typical kitchen cleaner is a simple concoction of baking soda and hot water? Yes, it works wonders on your kitchen plumbing while being easy on your pocket. Also, according to Consumer Reports’ survey, 28% people prefer to use homemade cleaning solutions like vinegar and baking soda.
Dubbed as the ‘baking soda drain detox,’ the process involves sprinkling half a cup of baking soda into the drain, followed by hot water. After about 20 minutes- voila! Your drain is clean, odorless, and toxin-free. It’s an eco-friendly solution known for its effectiveness in cleaning and refreshing kitchen plumbing without employing harsh chemicals.
Regular use of this method ensures your kitchen stays fresh. Stats tell us that most people clean their kitchen taps only once every seven days-so incorporating this simple task can raise your cleanliness quotient significantly!
Garbage Disposal: Cleaning 101
Maintaining your garbage disposal is simply another way to keep your kitchen plumbing at its best. Here’s how you need to handle it:
Switch off power from the mains before diving in with your cleaning-challenge as safety always takes precedence! Use tongs to remove any large waste and scrub under flaps to discard buildup.
A popular method involves ice cubes and coarse salt- turn on the unit and pour this mixture into the disposal. The abrasive action scrubs the walls well, making it fuss-free cleaning! After this, for a refreshing end, throw in few citrus peels.
Regular maintenance prevents build up, ensures smooth function, and extends the lifespan of your unit and service.
Sanitizing Taps Regularly
Sanitizing taps go beyond aesthetics- it’s about health safety too. Given the constant handling, taps make an excellent breeding ground for microscopic nasties. Hence, regular sanitization is essential.
You can use disinfectant wipes or spray- ensure to cover all areas including the handle and spout. With a minimum contact time (as suggested on the product), wipe it dry using a clean cloth. During flu season or times when hand hygiene is critical such as during pandemics, increase sanitization frequency as an added precaution.
Having shiny taps is just the bonus here!
Weekly Tap Cleaning Regimen
The key to keeping your kitchen fixtures in great shape is regular cleaning. A weekly cleaning regimen for your tap can be very effective.
Cleaning kitchen fixtures once a week reduces lime and calcium buildup which can impair function over time. Moreover, if you live in an area with hard water, weekly cleaning is nearly essential.
Complimentary to previous cleanliness efforts, a mild soap solution will do the trick. Remember to scrub every part including aerators and don’t forget to rinse and dry thoroughly.
Time spent now saves you from wearing out your taps prematurely!
Removing Tap Calcium Buildup
A build-up of calcium or lime is a dreaded reality for many homeowners. Fortunately, removing it can be simple and breezy if handled routinely.
Vinegar is your savior here. Mixing equal parts vinegar and water, spray it onto the build-up, let it sit for a few minutes, then scrub away. For stubborn stains, soak a cloth in vinegar-water solution, then wrap the tap and leave for 10 to 30 minutes before scrubbing.
Note: While vinegar is safe for most materials, it’s best to test a small amount first if you have unique finishes on your tap.
Getting rid of that scaling enforces not just cleanliness but also seamless function of your taps.
Conclusion: Maintain Clean Kitchen Plumbing
In conclusion, maintaining clean kitchen fixtures isn’t complicated or time-consuming; rather, it’s about consistency. By following these steps and using simple ingredients like baking soda and vinegar, you are saving money while ensuring the health safety of your household. Remember – happy home chef equals happy kitchen plumbing!
Frequently Asked Questions (FAQ)
How often should I clean my kitchen fixtures?
It depends on how frequently you use your kitchen, but generally, it is advisable to clean your fixtures once every week. Routine cleaning helps prevent the buildup of germs while ensuring functional efficiency.
Can I use vinegar to clean all my kitchen fixtures?
While vinegar is an effective cleaner, it is not suitable for all materials, particularly special finishes like nickel or antique finishes. It is advisable to test a small amount on a hidden area first before applying it to the entire fixture.
Is a store-bought cleaner better than homemade cleaning solutions?
Either can be effective in cleaning your kitchen fixtures. It all depends on your preference and the material of your fixtures. Nonetheless, you should always ensure the cleaning product is suitable for your fixture material to avoid causing damage.
How can I remove stubborn stains from my stainless-steel sink?
A paste made from baking soda and water can work wonders on stainless steel sinks. Apply the paste, let it sit for a little while, and then gently scrub the stain away with a non-scratch sponge.
What is an aerator and how do I clean it?
An aerator is a device located at the tip of your tap. It helps maintain water pressure and prevent splashing. To clean it, carefully unscrew it from the tap, and clean it with vinegar and a toothbrush.
How can I safely maintain my porcelain sink?
Porcelain sinks should be cleaned after each use with a cleaner specifically formulated for porcelain. For tougher stains, you can use baking soda. Remember to always use a soft cloth or sponge and avoid abrasive materials.
How often should I sanitize my taps?
Sanitizing your taps should be a frequent process, ideally every time you clean your kitchen. During flu season or during pandemics, you should sanitize your taps more regularly as an added precaution.
What homemade cleaning solution can I use for my kitchen fixtures?
A convenient and natural cleaning solution can be made with equal parts of vinegar and water. This mixture works effectively on most kitchen fixtures. Another concoction includes baking soda and hot water, especially for kitchen plumbing or drainpipes.
- Can I Get a Plumber to Help Me Install An Under Sink Water Boiler in Our Office Kitchen? - September 14, 2024
- Can a Plumber Help Me Clear a Badly Clogged Toilet? - September 4, 2024
- Can a Plumber Help Me to Replace a Bathtub Drain Stopper? - August 29, 2024
Related posts:
 How Often Should I Replace My Plumbing Fixtures?
 How Do I Minimise Fruit Flies in My Kitchen Sink?
 How Do I Prevent Food Scraps From Clogging My Kitchen Drain?
 How Do I Remove Mineral Deposits From My Showerhead?
 What Is The Best Way to Clean The Grout in My Shower to Keep My Gold Coast Bathroom Clean And Fresh?
 Can Your Plumbers Help Me Replace a Leaky Kitchen Sink?